Super Administrator
The Super Administrator role represents the highest level of administrative access within OneByZero Neo. Super Administrators have platform-wide authority to manage workspaces, configure LLM models, control default tools and MCPs, and monitor analytics across the entire Neo deployment. This centralized control enables organizations to maintain consistent governance, security policies, and resource management across all workspaces.
Super Administrators access their administrative functions through the Control Center, which provides a unified interface for all platform-wide management tasks.
Workspaces Management
The Workspaces tab provides Super Administrators with a comprehensive view of all workspaces within the Neo platform. From this interface, administrators can create new workspaces, manage existing ones, and delete workspaces that are no longer needed.
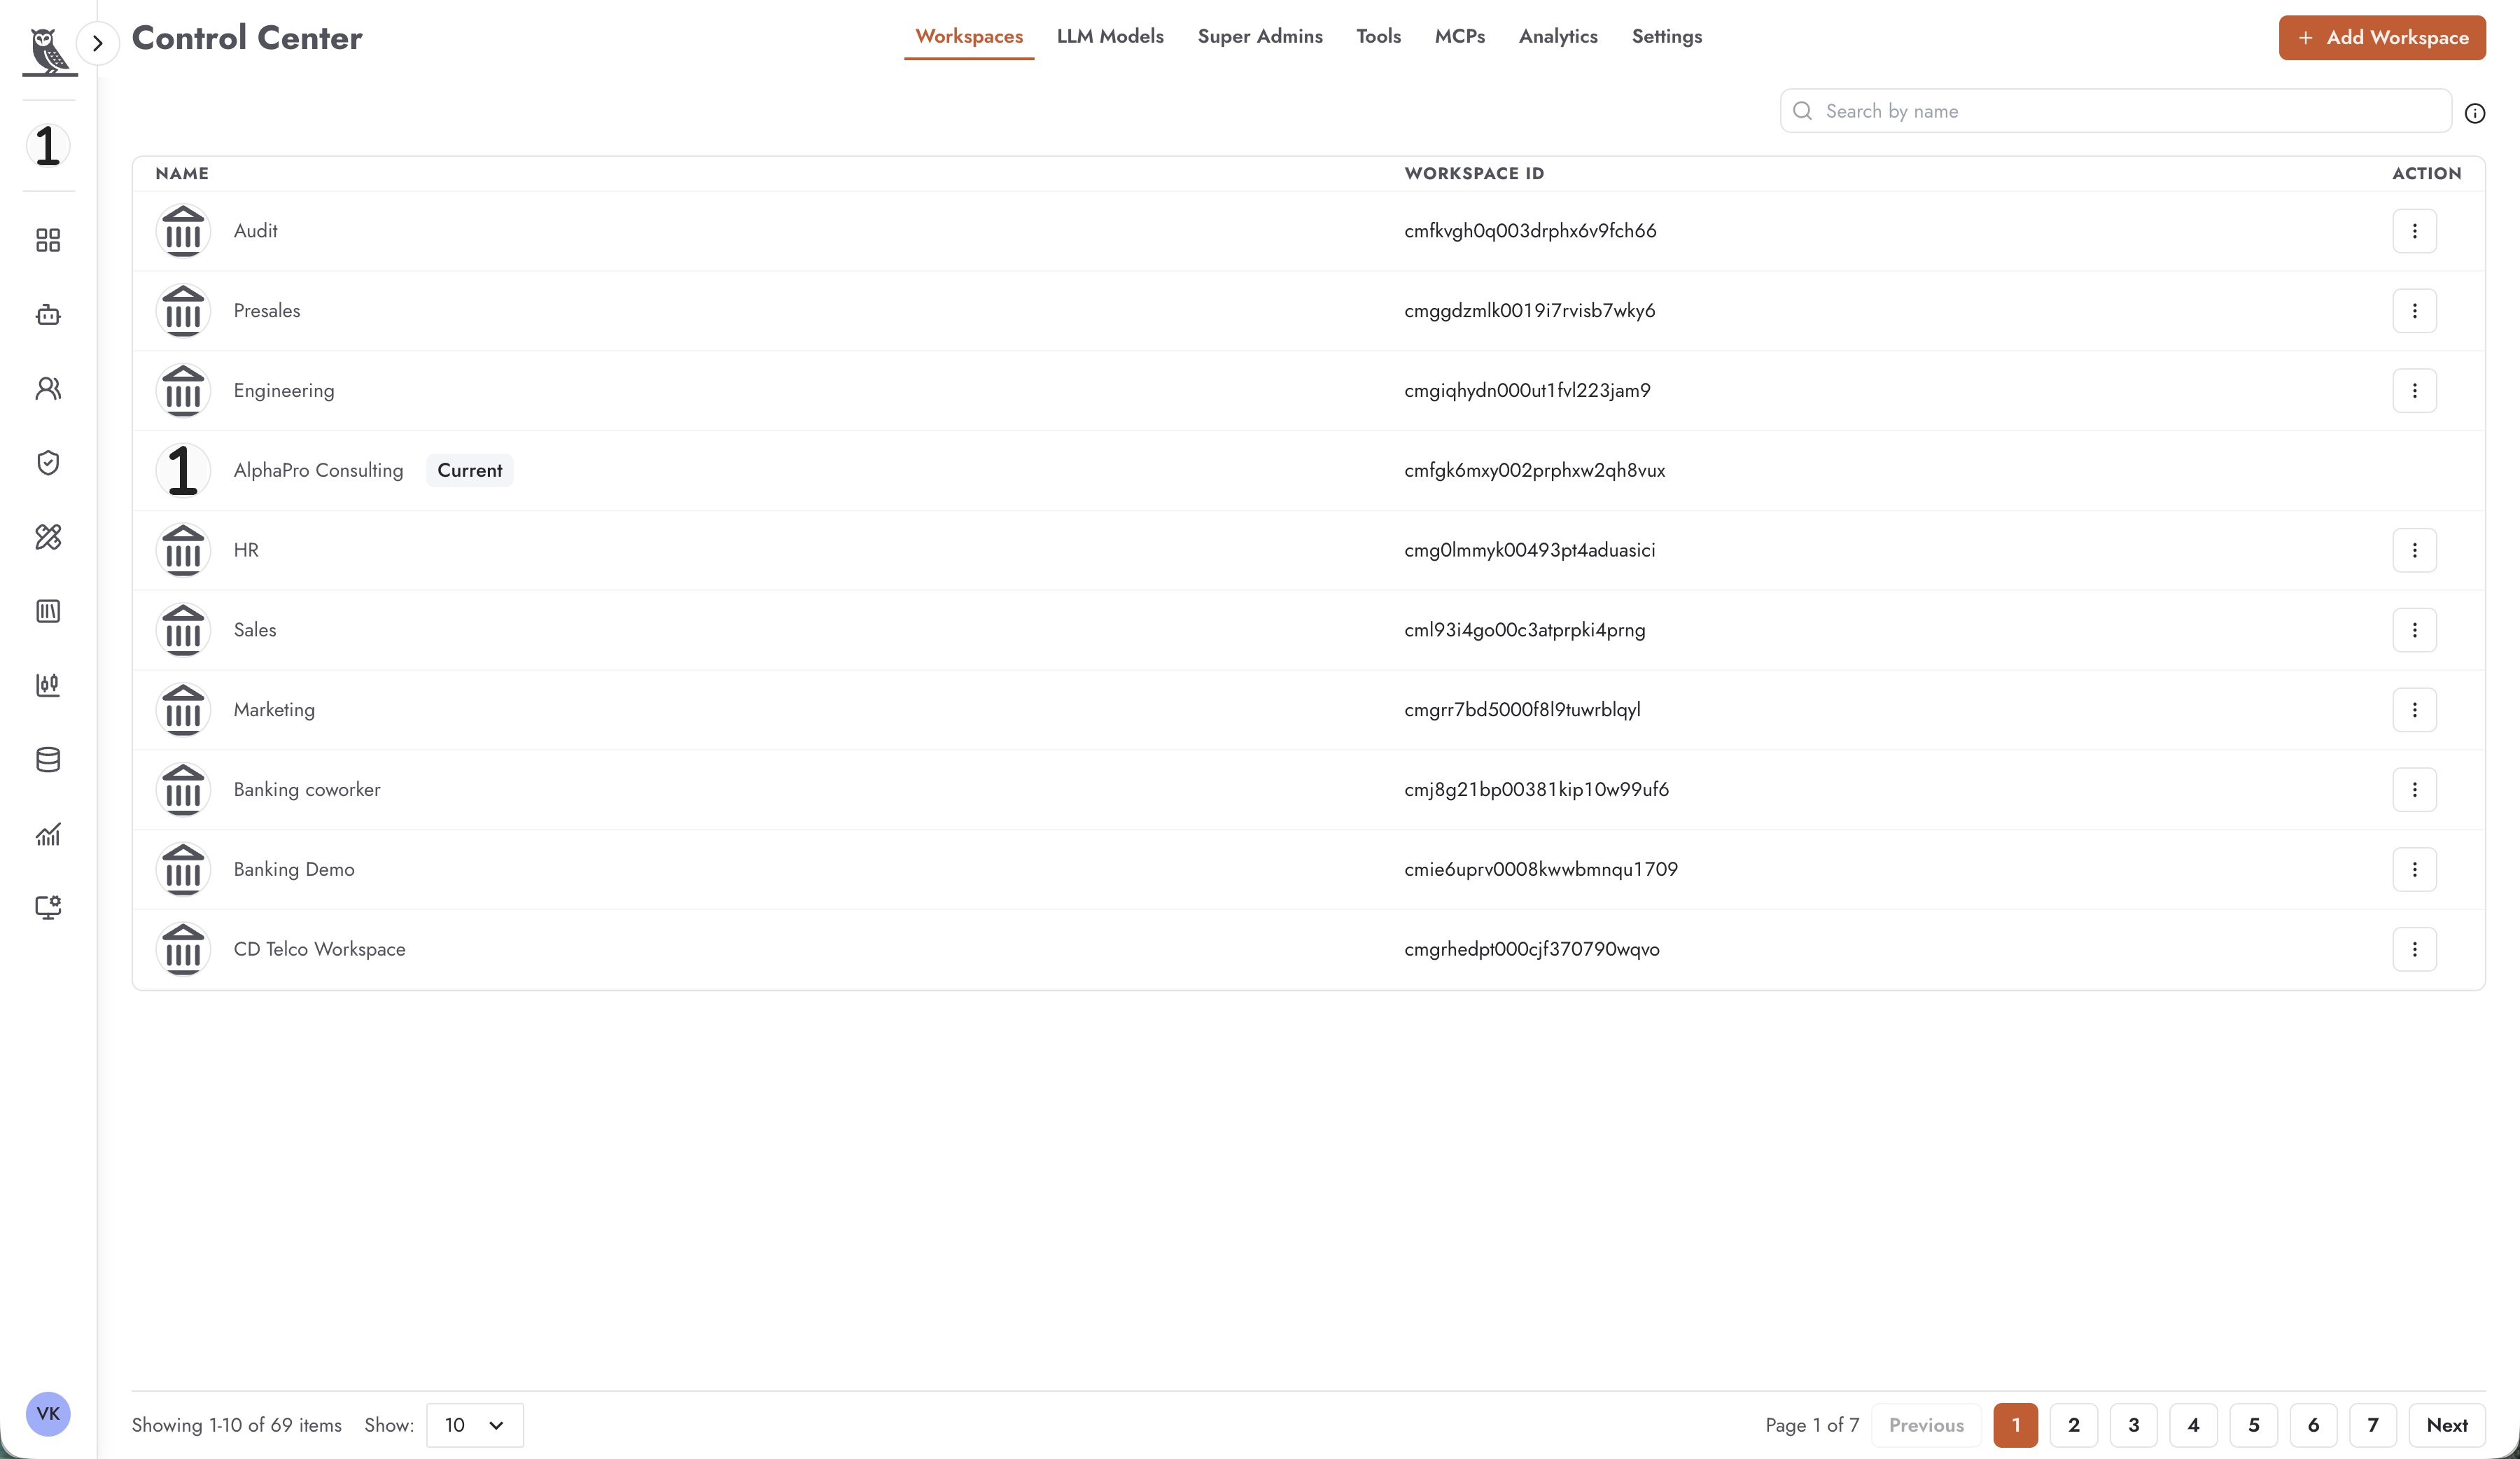
The workspaces list displays:
Name - The workspace name, with the current workspace indicated by a “Current” label
Workspace ID - A unique identifier for each workspace
Action - Menu for workspace-specific operations including deletion
Creating a New Workspace
Click the + Add Workspace button to create a new workspace. The creation dialog allows you to configure:
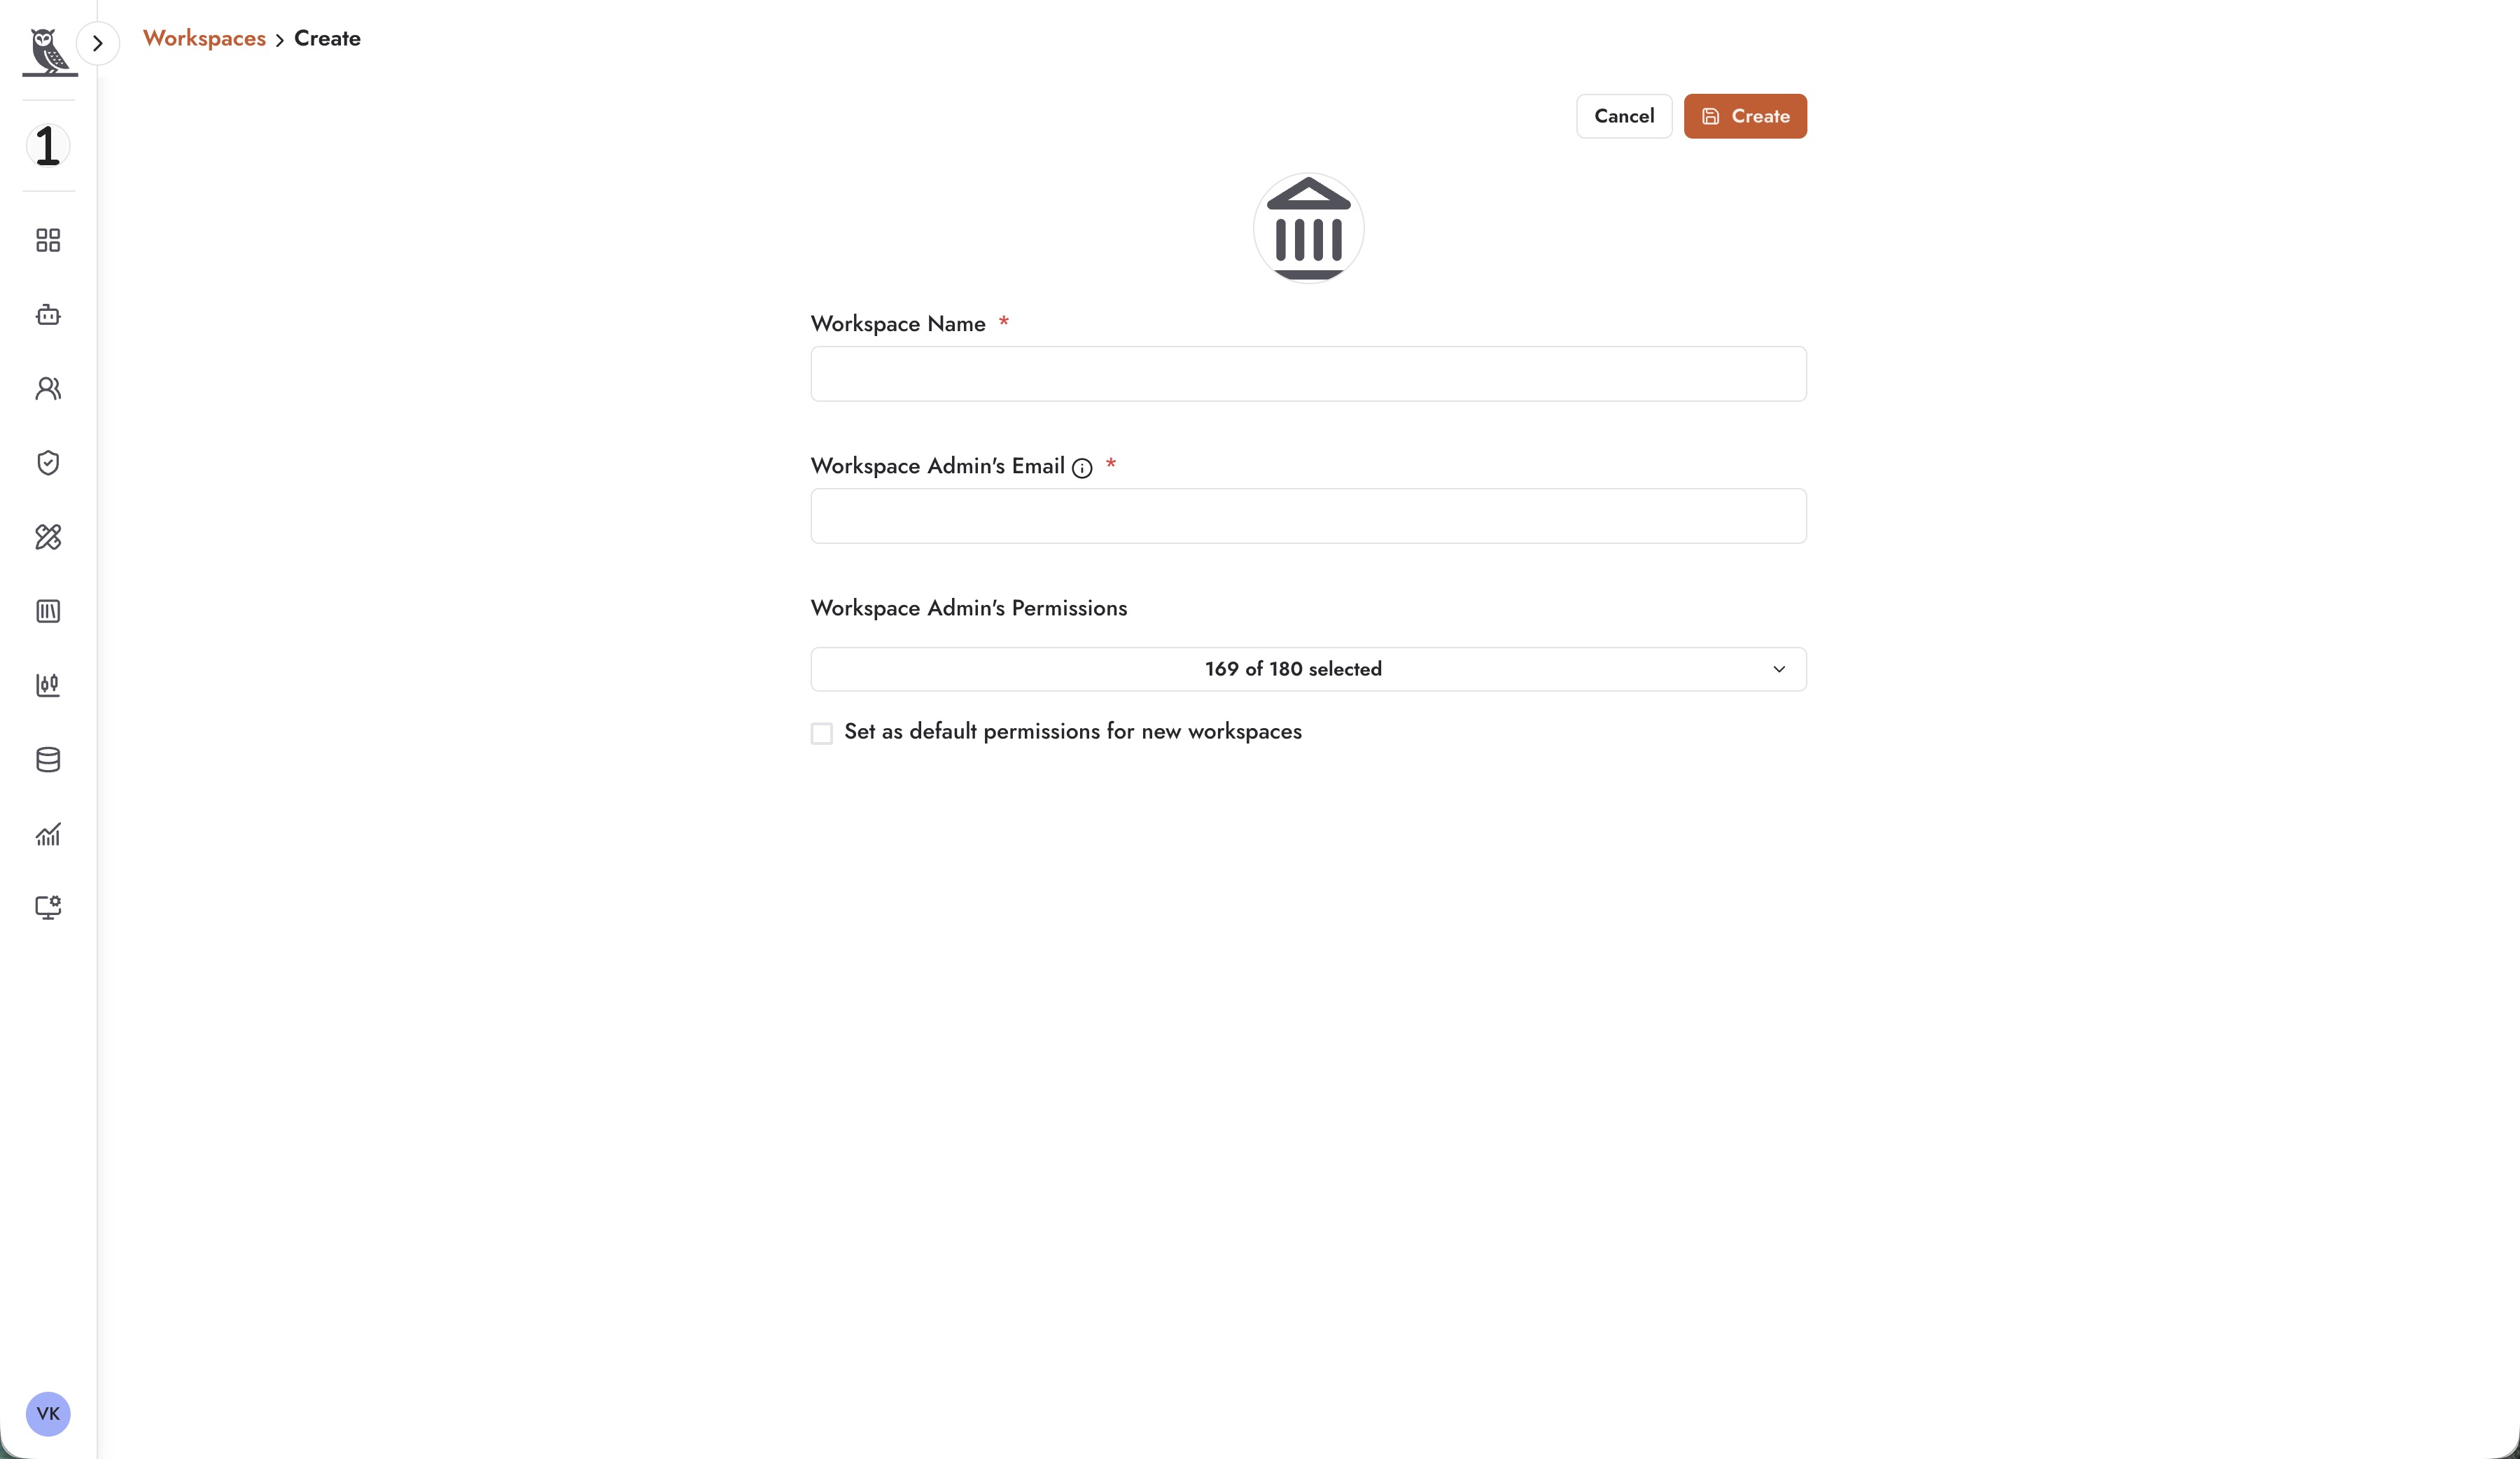
Workspace Name - A descriptive name for the workspace
Workspace Admin’s Email - The email address of the user who will be assigned as the workspace administrator
Workspace Admin’s Permissions - Select which permissions the workspace admin will have (e.g., 169 of 180 available permissions)
Set as default permissions for new workspaces - Option to use these permissions as the template for future workspaces
Deleting a Workspace
Super Administrators can delete any workspace using the action menu. Exercise caution when deleting workspaces, as this action removes all agents, knowledge bases, and configurations within that workspace.
LLM Models Management
The LLM Models tab enables Super Administrators to manage the Large Language Models available across all workspaces. This centralized control ensures consistent model availability and allows organizations to add new models, including self-hosted ones, as they become available.
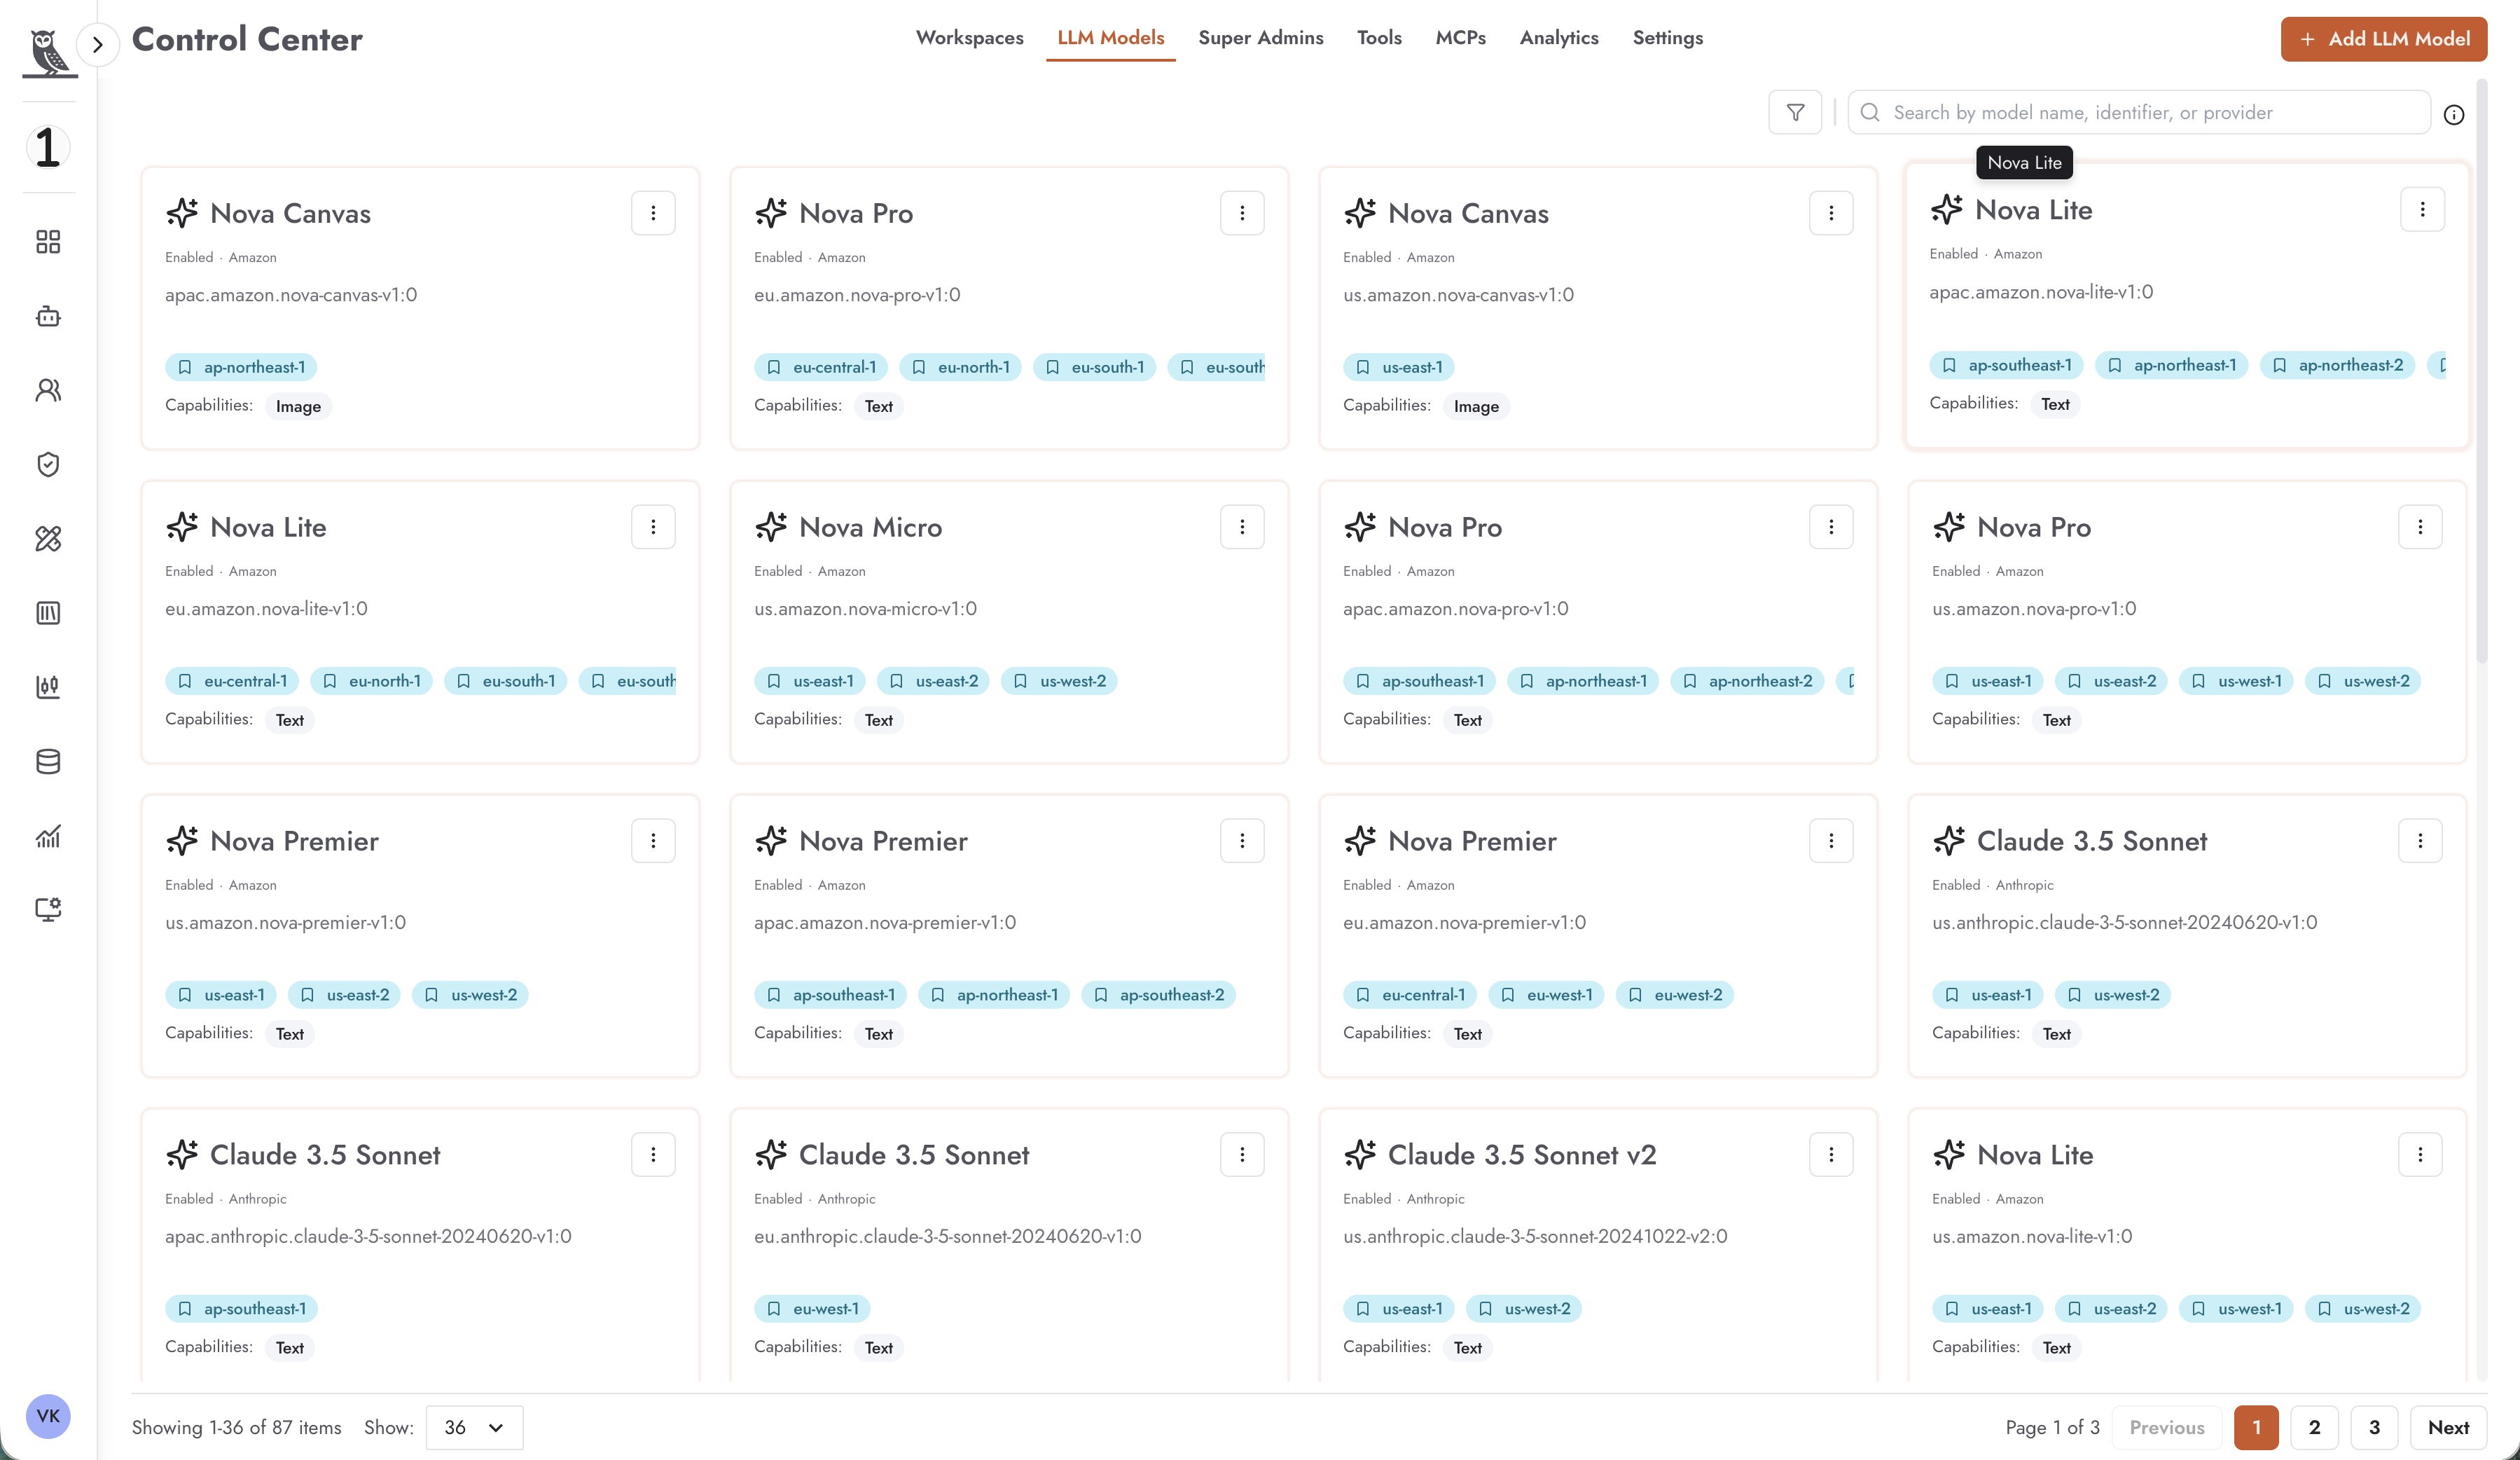
The LLM Models interface displays all configured models as cards, showing:
Model Name - The display name of the model (e.g., Nova Canvas, Claude 3.5 Sonnet)
Provider - The model provider (Amazon, Anthropic, etc.)
Model Identifier - The unique identifier used to invoke the model
Regions - AWS regions where the model is available
Capabilities - What the model can process (Text, Image)
Enabling and Disabling Models
Super Administrators can enable or disable LLM models across all workspaces. When a model is disabled, it becomes unavailable for use in any workspace, ensuring consistent model governance across the platform.
Adding New LLM Models
Click + Add LLM Model to add a new model to the platform. This is particularly useful for adding self-hosted models or newly released models from providers.
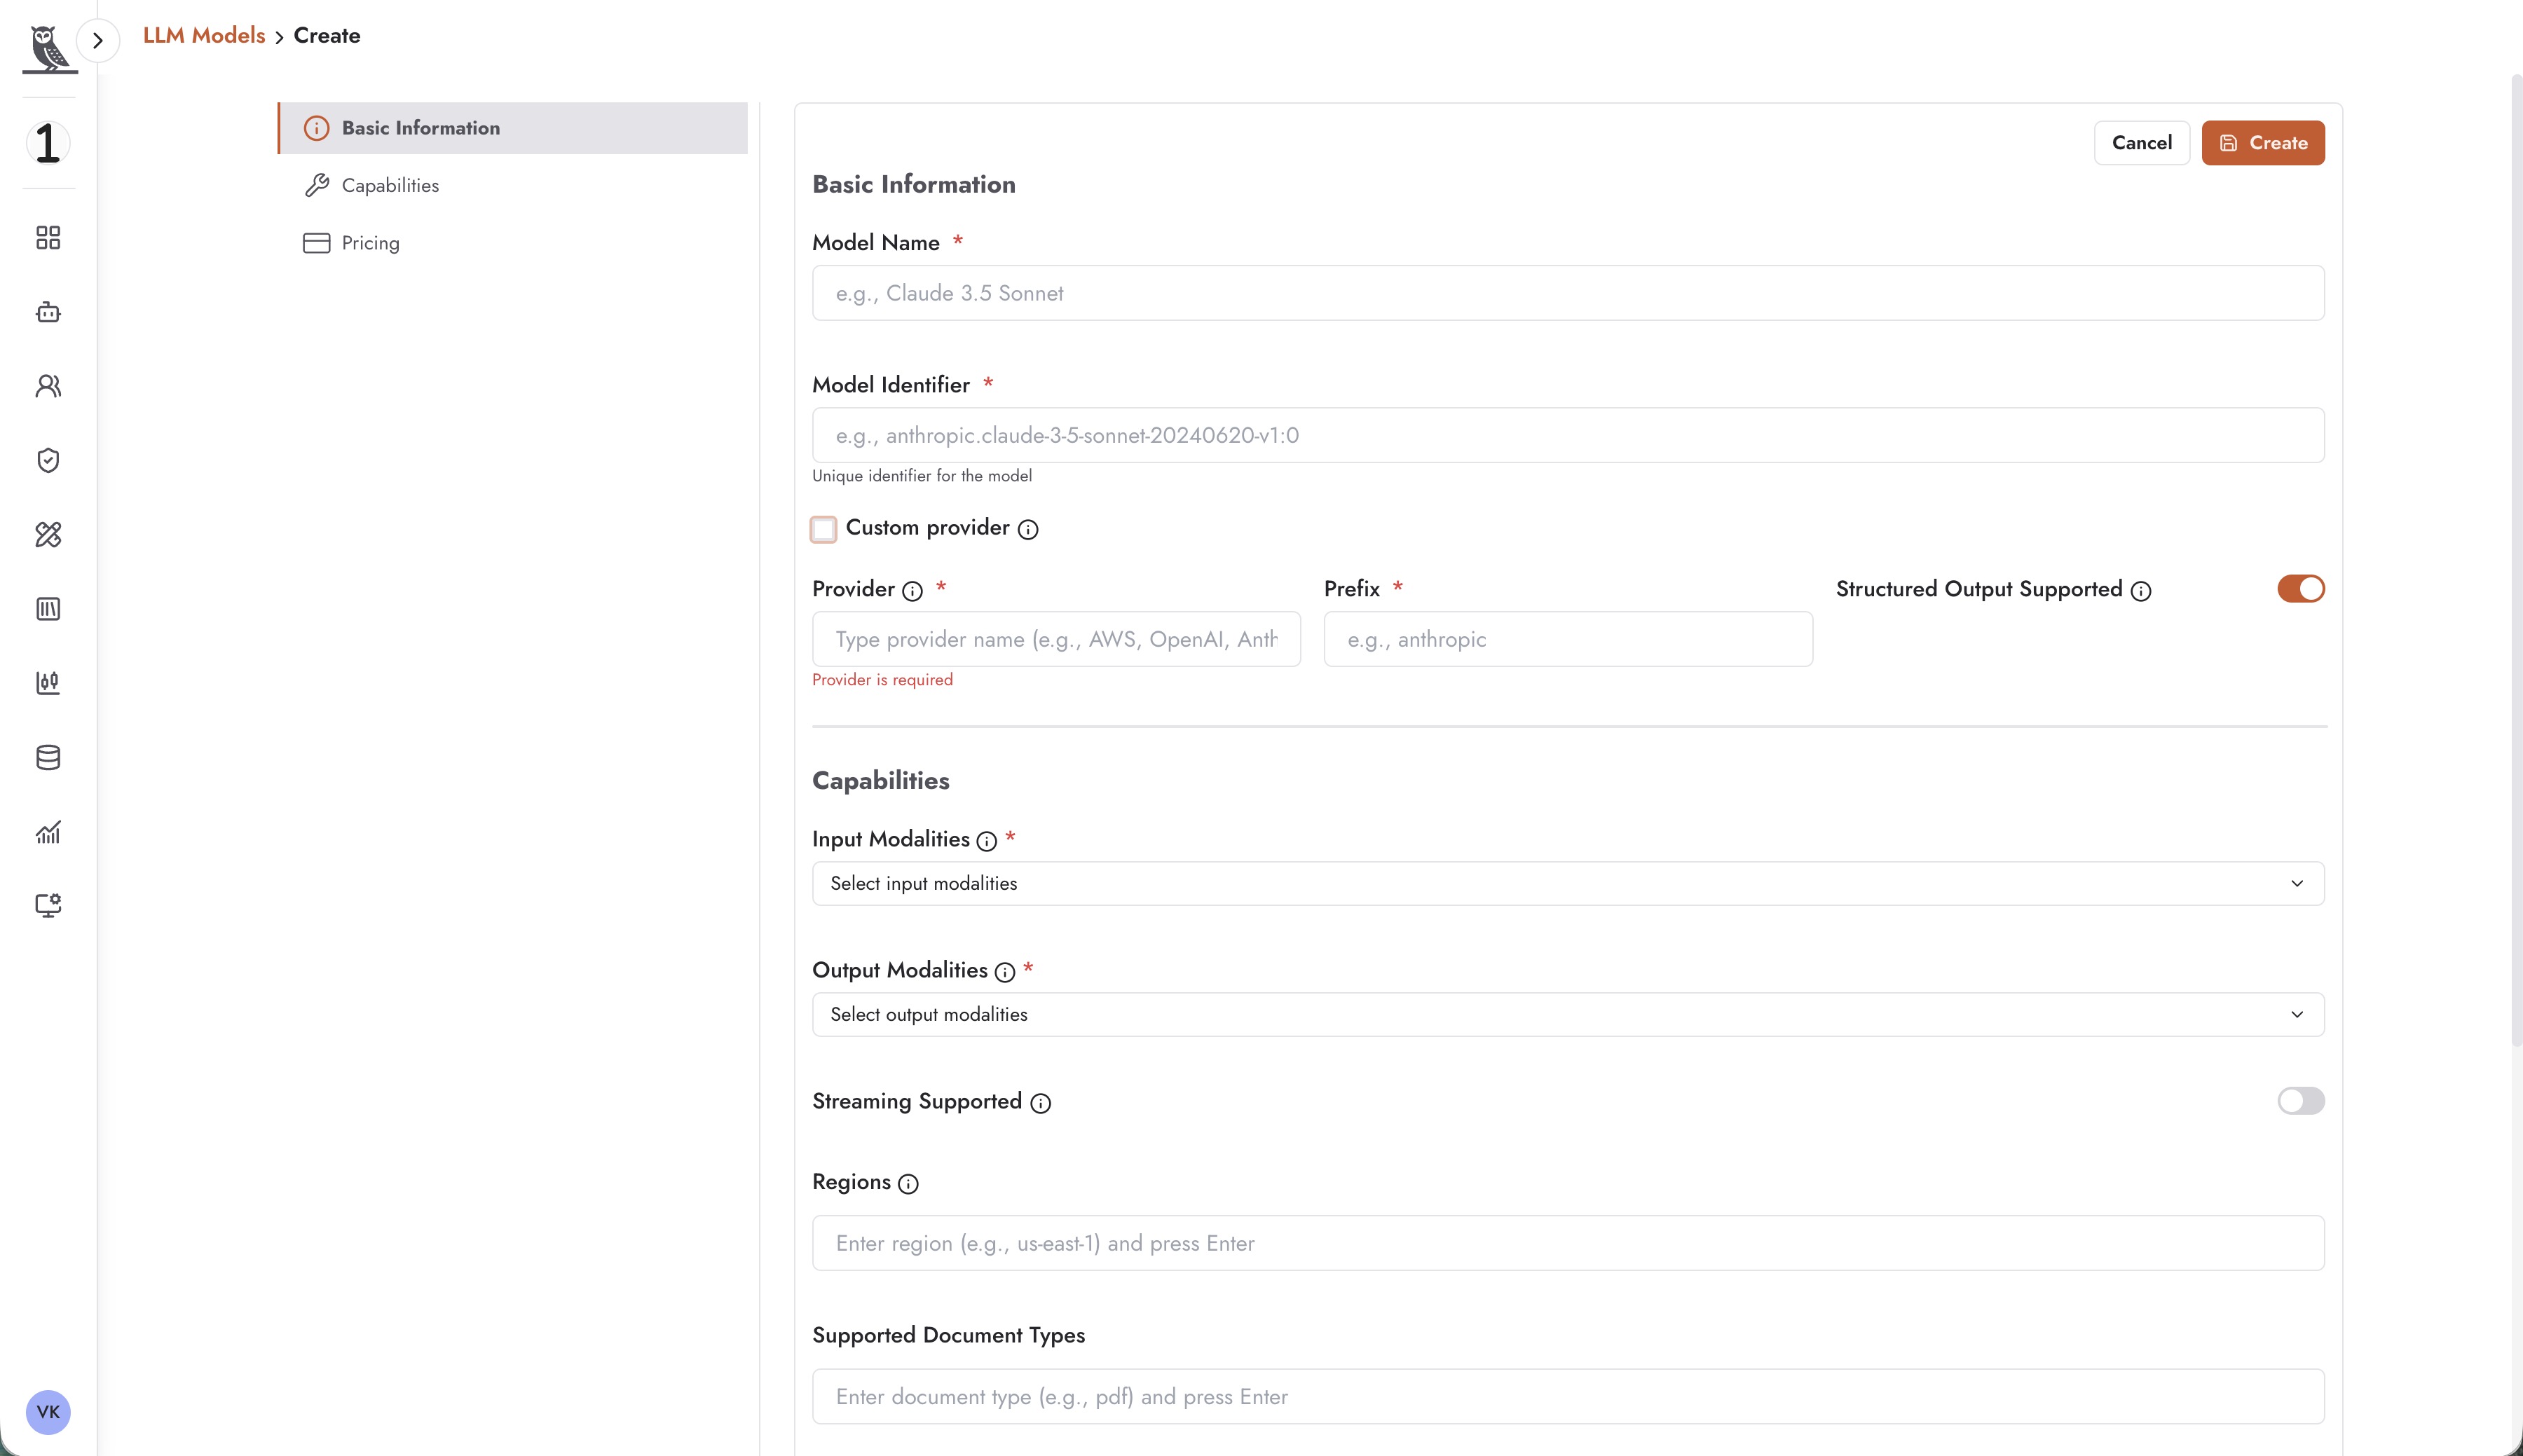
The model configuration includes:
Basic Information
Model Name - A human-readable name for the model
Model Identifier - The unique identifier used to call the model (e.g., anthropic.claude-3-5-sonnet-20240620-v1:0)
Custom Provider - Enable this for self-hosted or non-standard model providers
Provider - The provider name (AWS, OpenAI, Anthropic, or custom)
Prefix - Provider prefix for the model identifier
Structured Output Supported - Whether the model supports structured output formats
Capabilities
Input Modalities - What types of input the model accepts (text, image, etc.)
Output Modalities - What types of output the model produces
Streaming Supported - Whether the model supports streaming responses
Regions - Which regions the model is available in
Supported Document Types - File types the model can process
Tools Management
The Tools tab allows Super Administrators to manage the default tools available to all workspaces. These are the built-in integrations that agents can use to perform various functions.
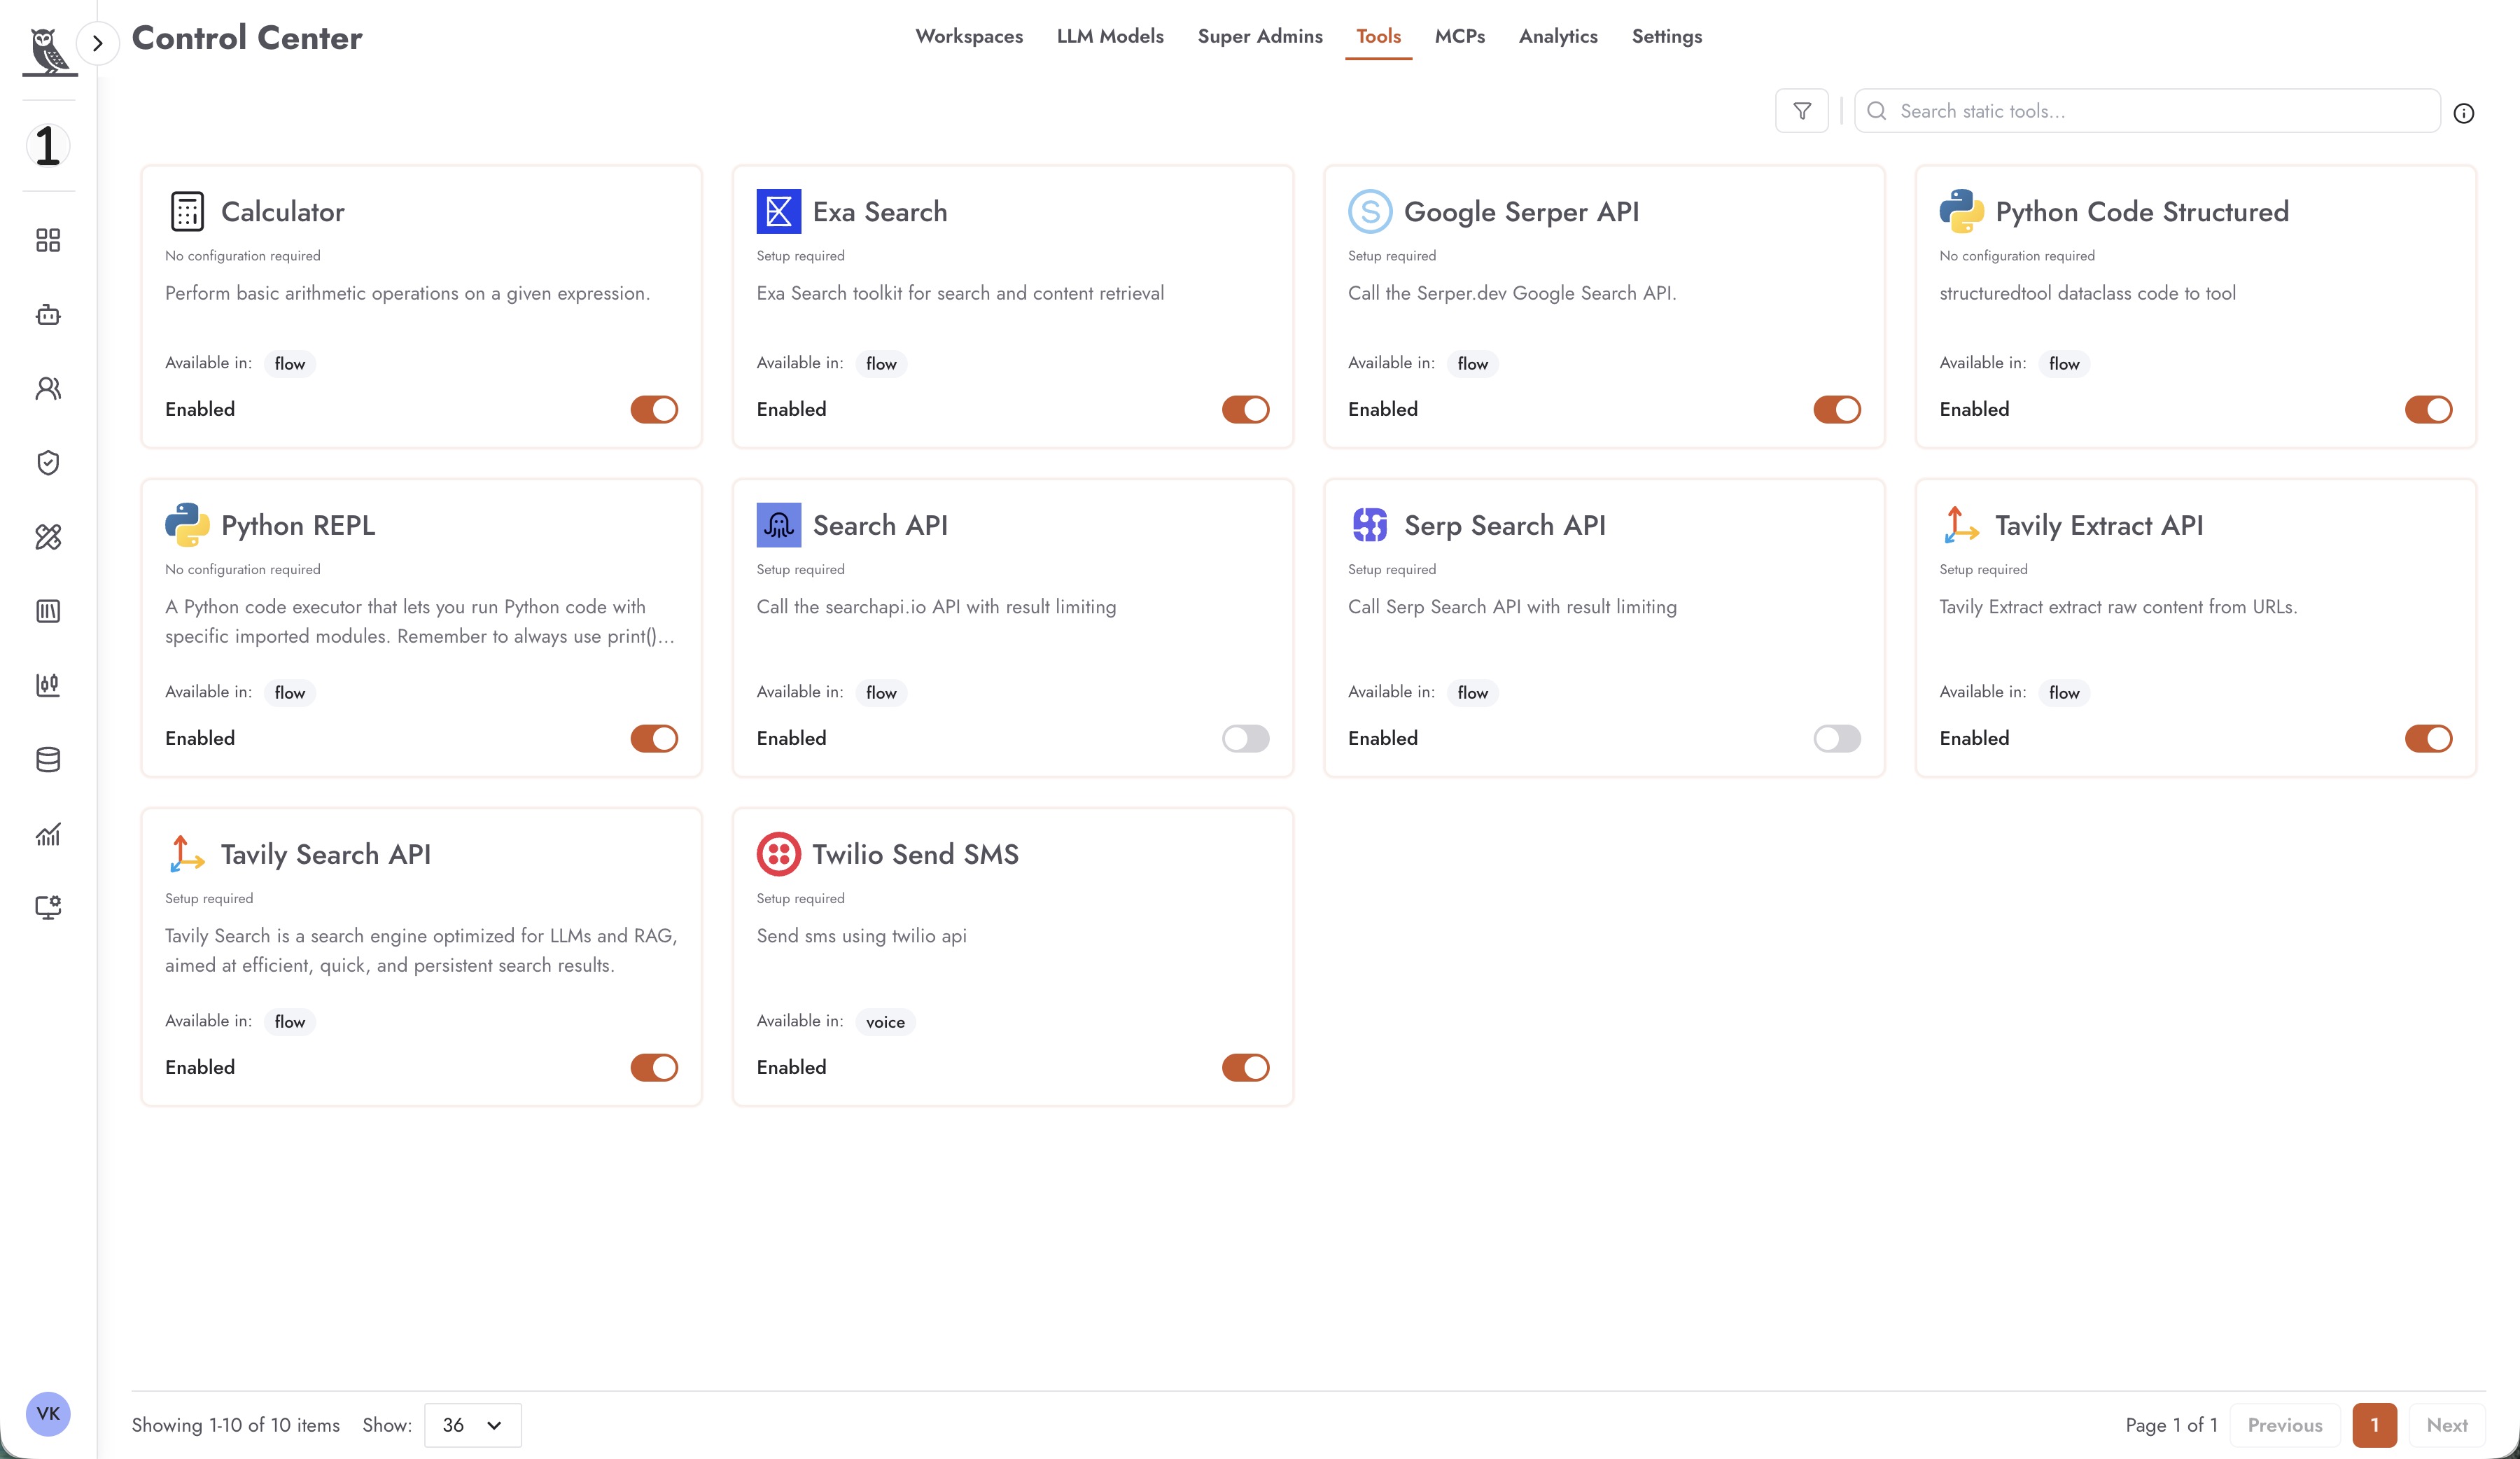
Each tool card displays:
Tool Name - The name of the tool (Calculator, Exa Search, Google Serper API, etc.)
Description - What the tool does
Configuration Status - Whether setup is required or no configuration needed
Available in - Which agent types can use the tool (flow, voice)
Enabled - Toggle to enable or disable the tool across all workspaces
Enabling and Disabling Tools
Super Administrators can enable or disable any default tool. When a tool is disabled at the platform level:
The tool becomes unavailable in all workspaces
Existing agents using the tool will lose access to that capability
Workspace administrators cannot override this setting
This centralized control is useful for:
Enforcing security policies by disabling certain integrations
Managing costs by controlling access to paid third-party APIs
Ensuring compliance by restricting access to specific capabilities
MCPs Management
The MCPs (Model Context Protocol) tab enables Super Administrators to manage MCP servers across the platform. MCPs provide standardized tool connectivity that can be shared across workspaces.
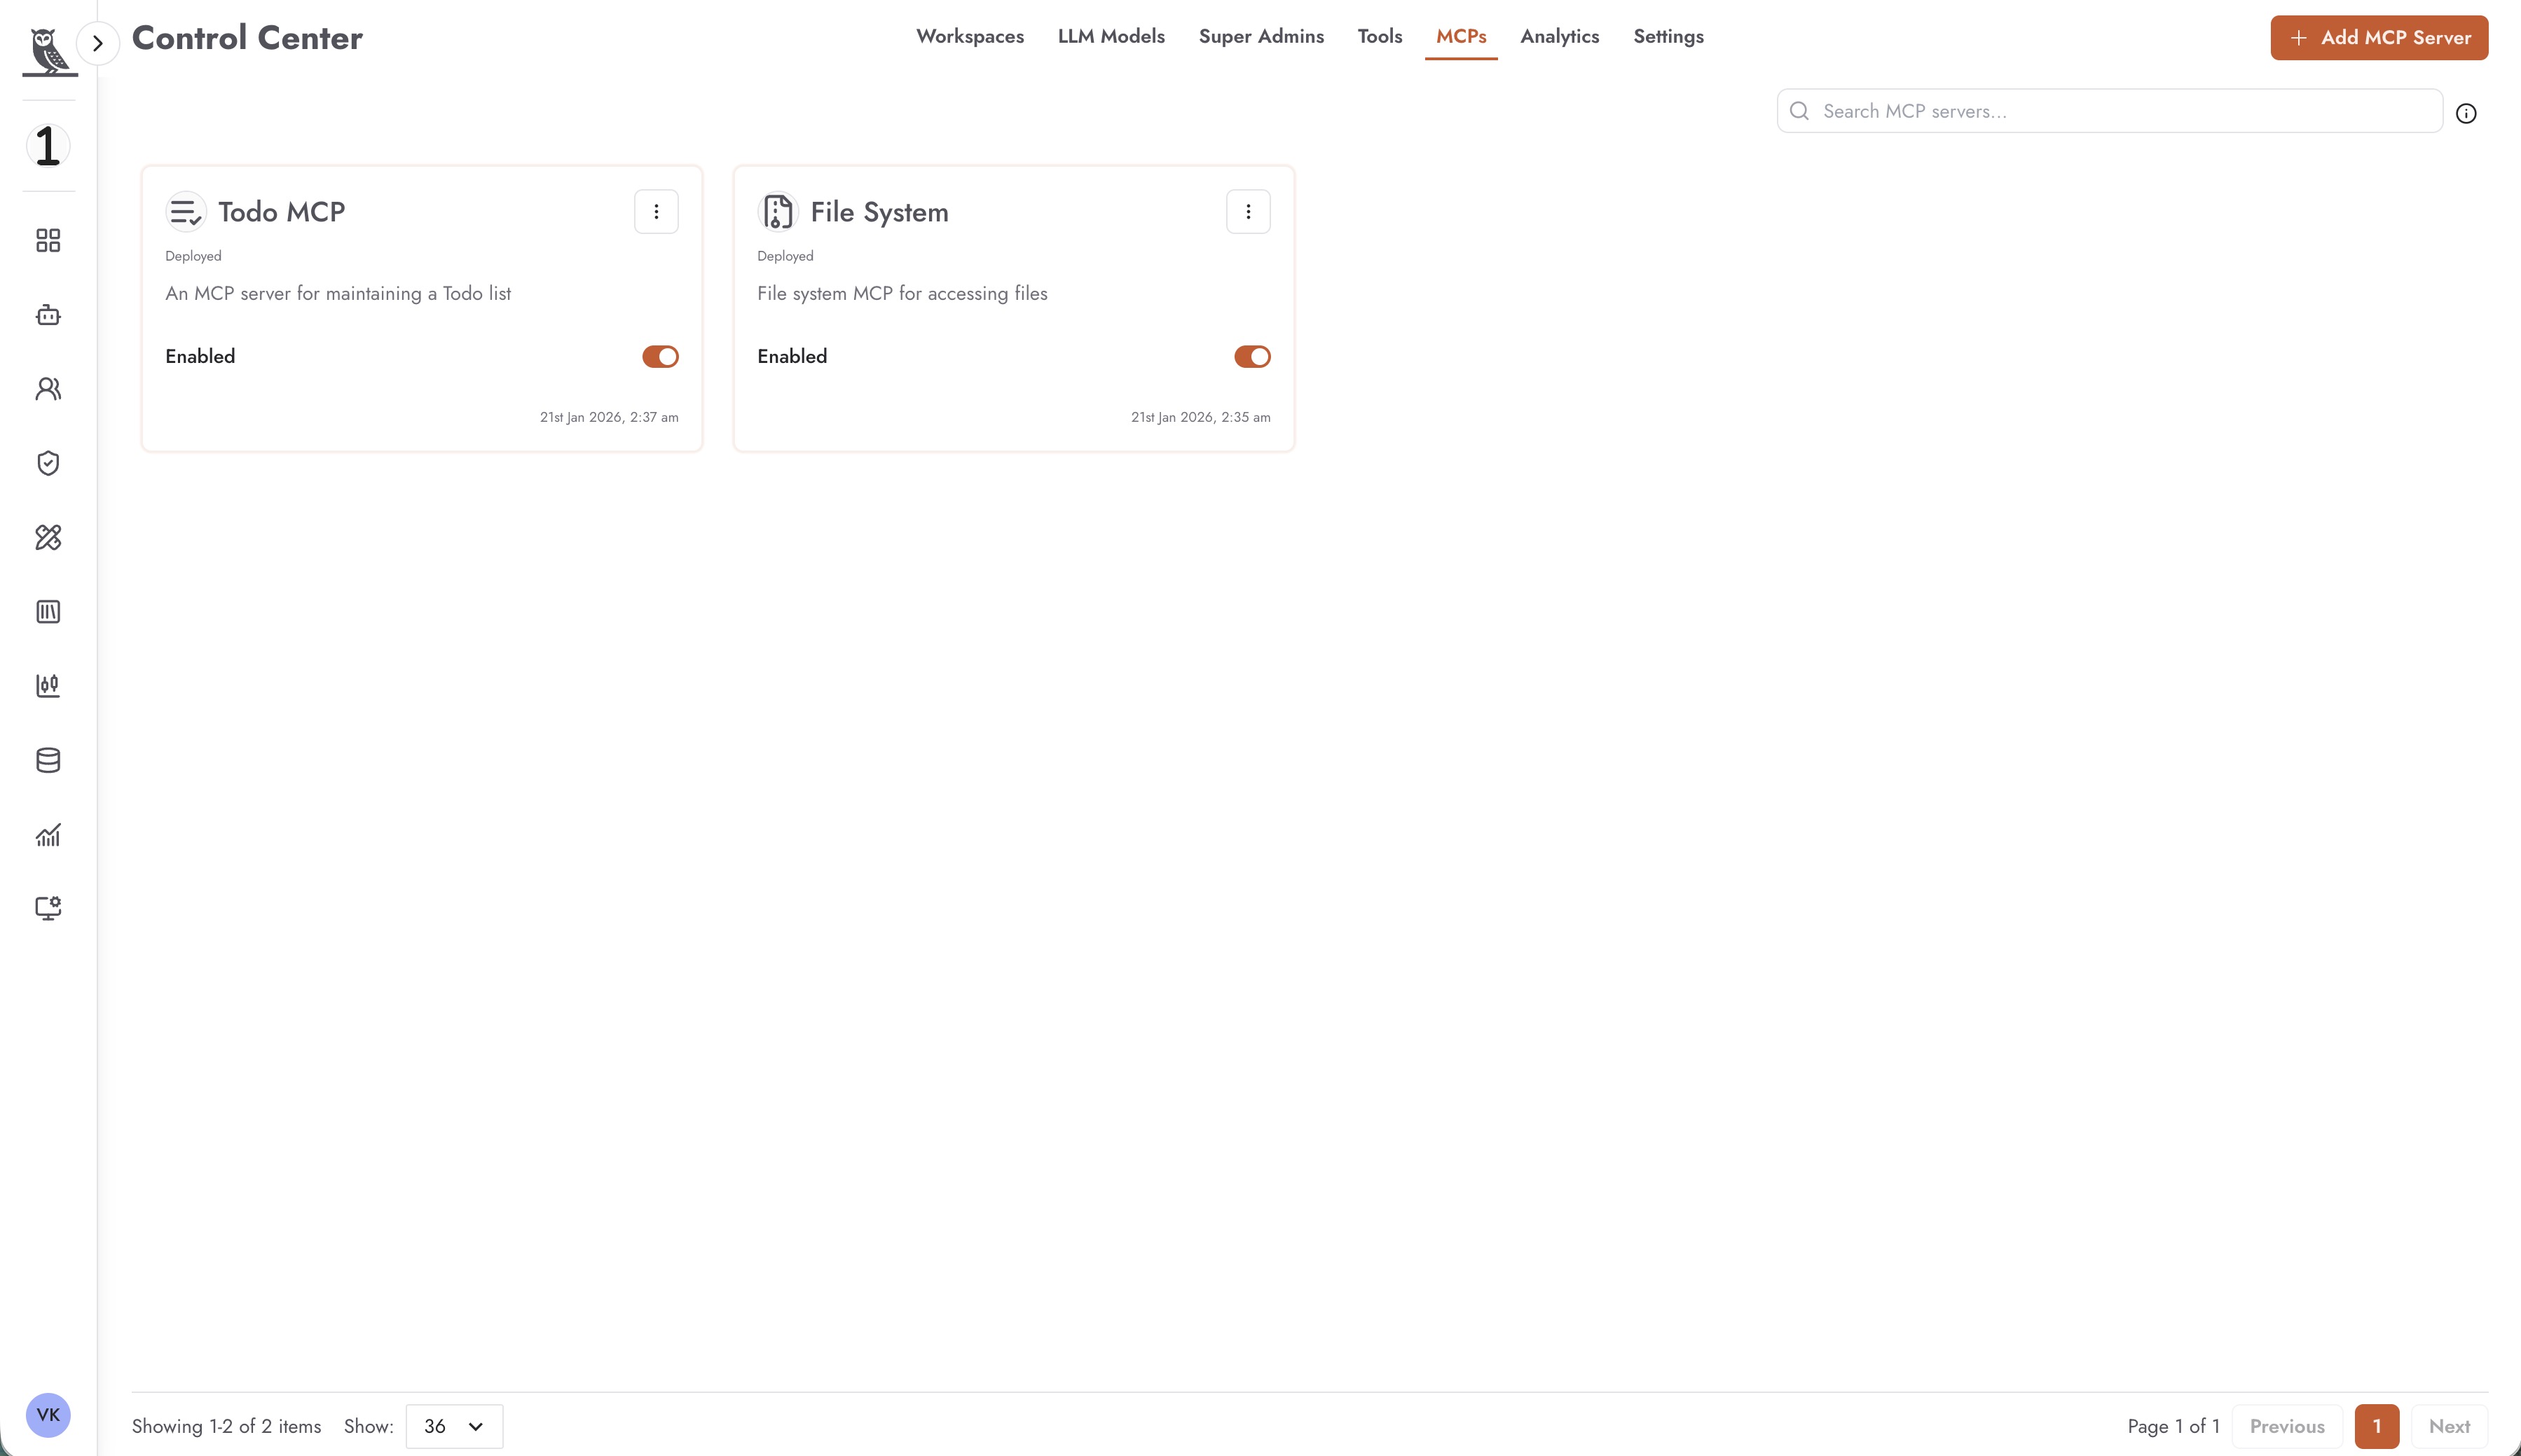
The MCP interface displays:
MCP Name - The name of the MCP server
Status - Deployment status (Deployed)
Description - What the MCP server provides
Enabled - Toggle to enable or disable the MCP
Timestamp - When the MCP was last updated
Enabling and Disabling MCPs
Similar to tools, Super Administrators can enable or disable MCP servers across all workspaces. This provides centralized control over which MCP capabilities are available to agents.
Adding New MCP Servers
Click + Add MCP Server to add a new MCP server to the platform.
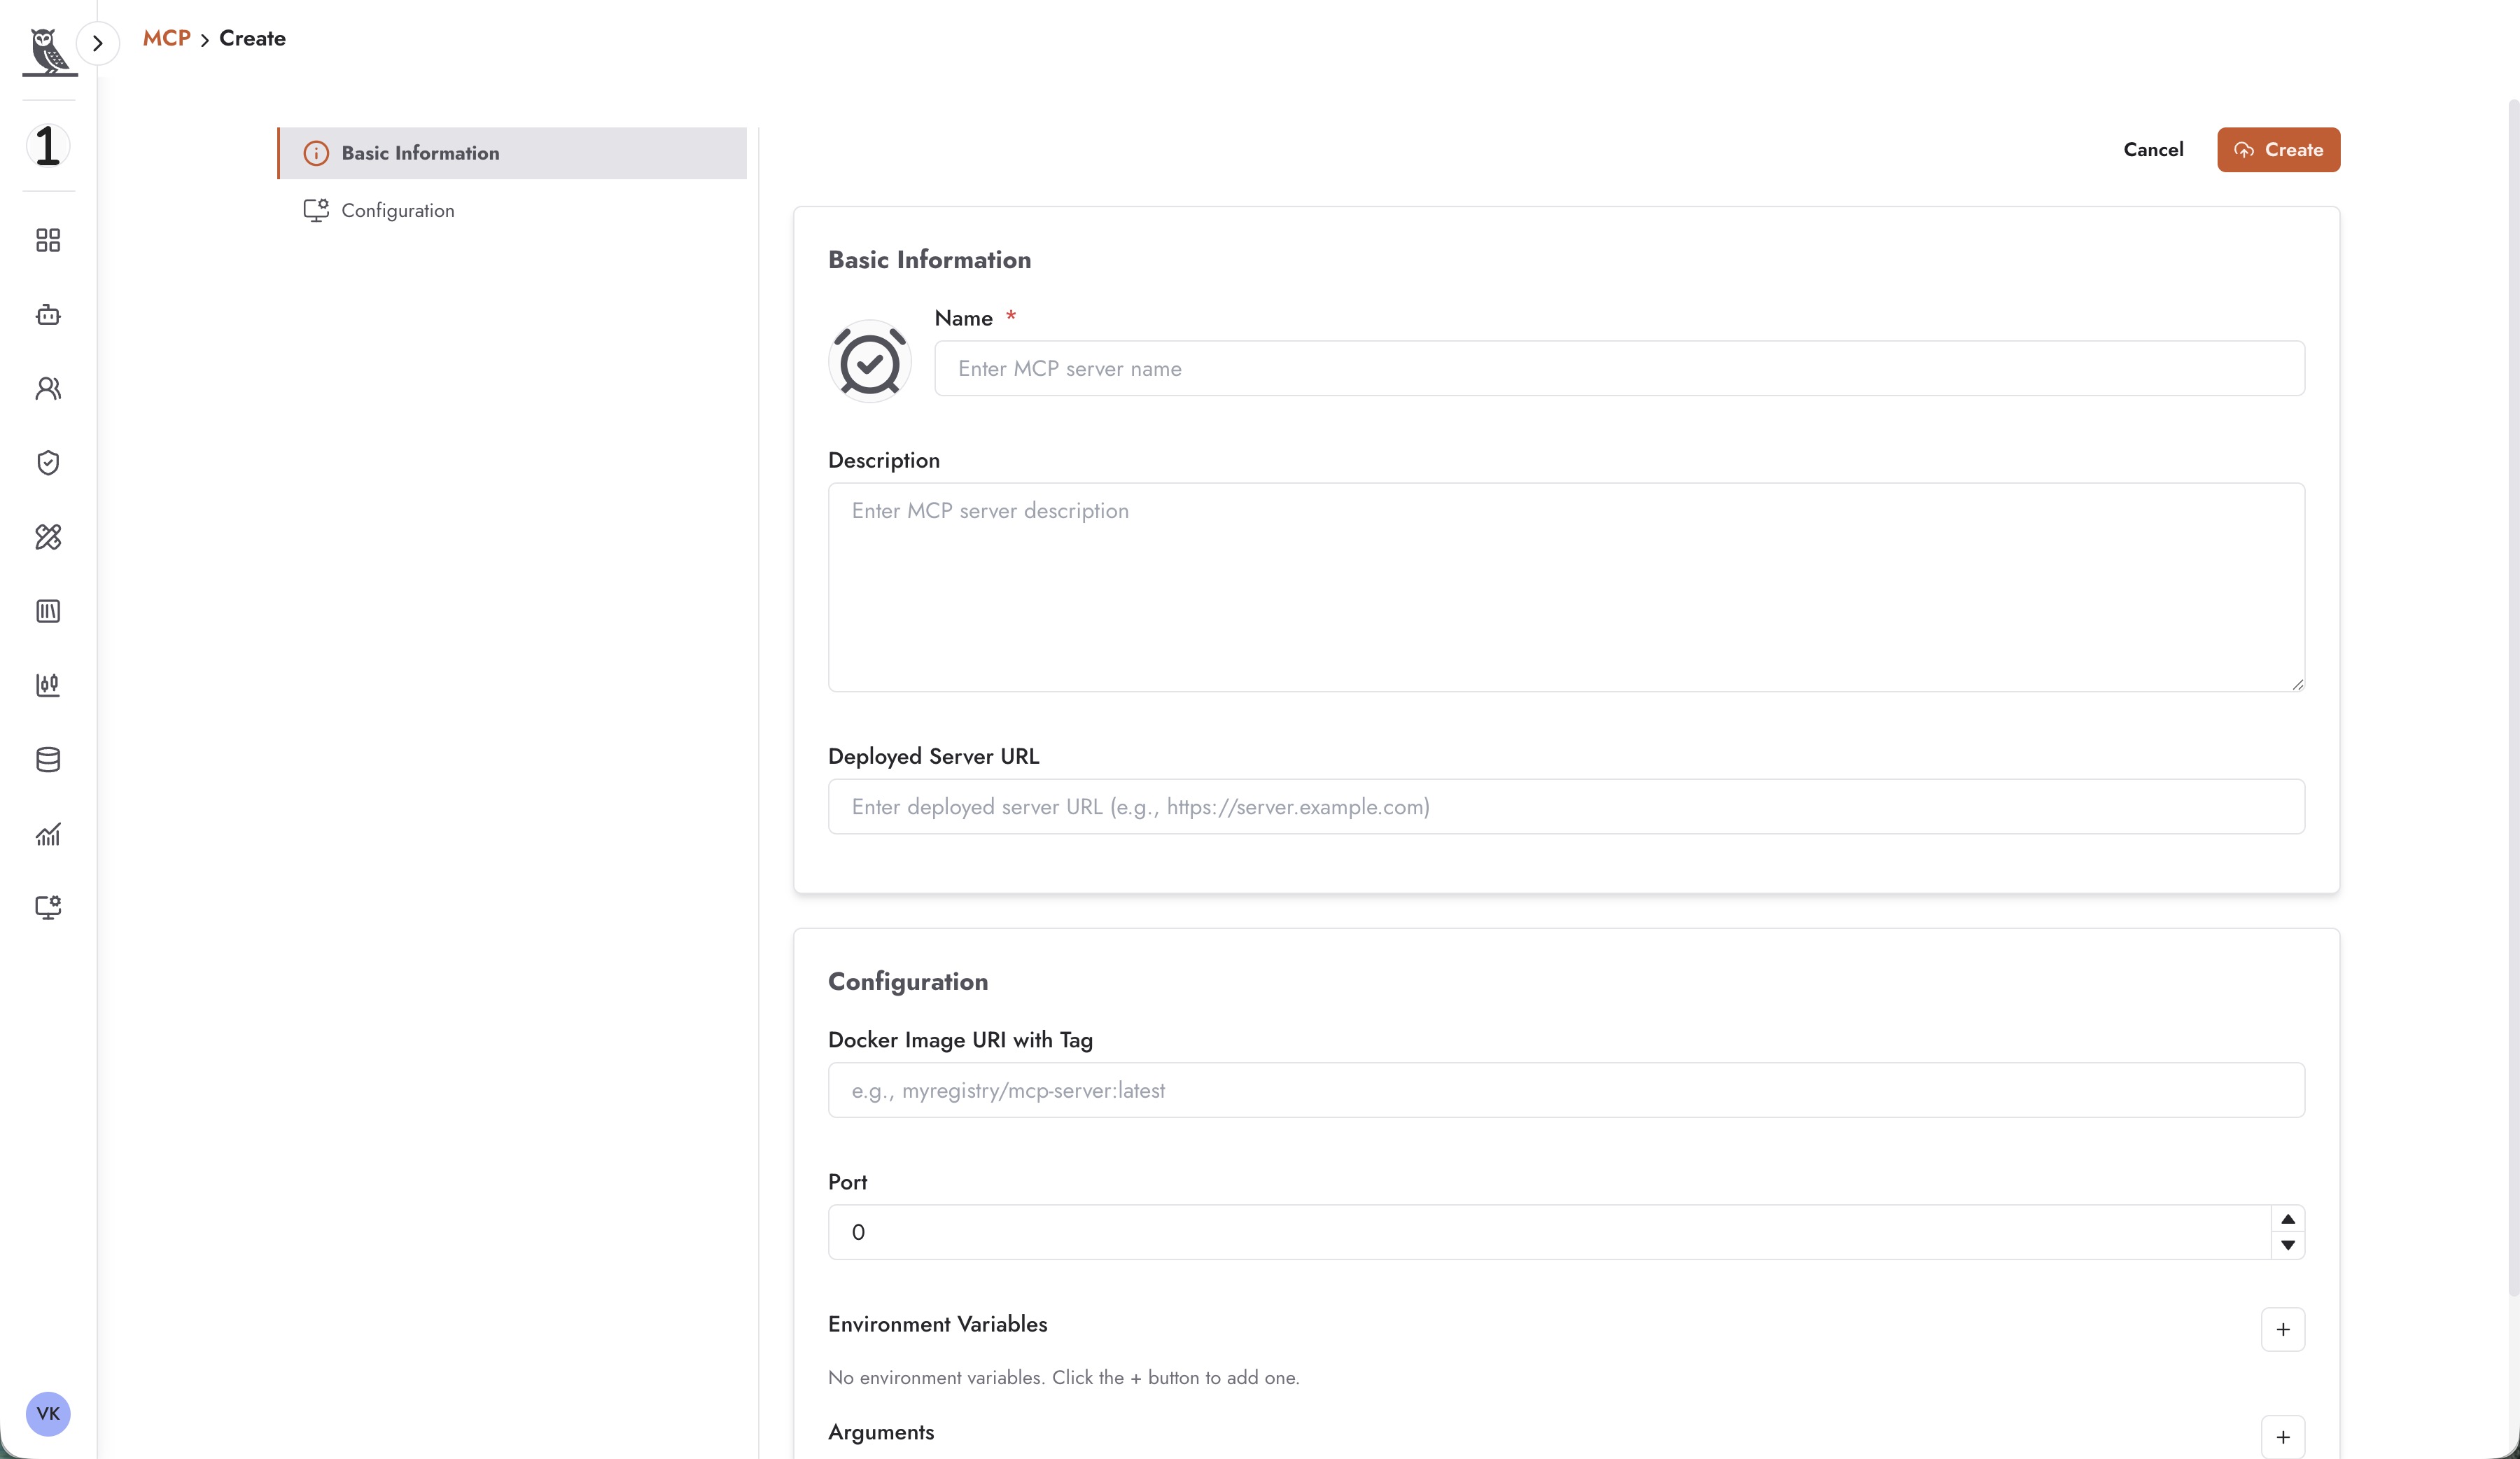
The MCP server configuration includes:
Basic Information
Name - A descriptive name for the MCP server
Description - Explanation of what the MCP server provides
Deployed Server URL - The URL where the MCP server is accessible
Configuration
Docker Image URI with Tag - The container image for the MCP server (e.g., myregistry/mcp-server:latest)
Port - The port the MCP server listens on
Environment Variables - Configuration variables for the MCP server
Arguments - Command-line arguments for the MCP server
Platform-Wide Analytics
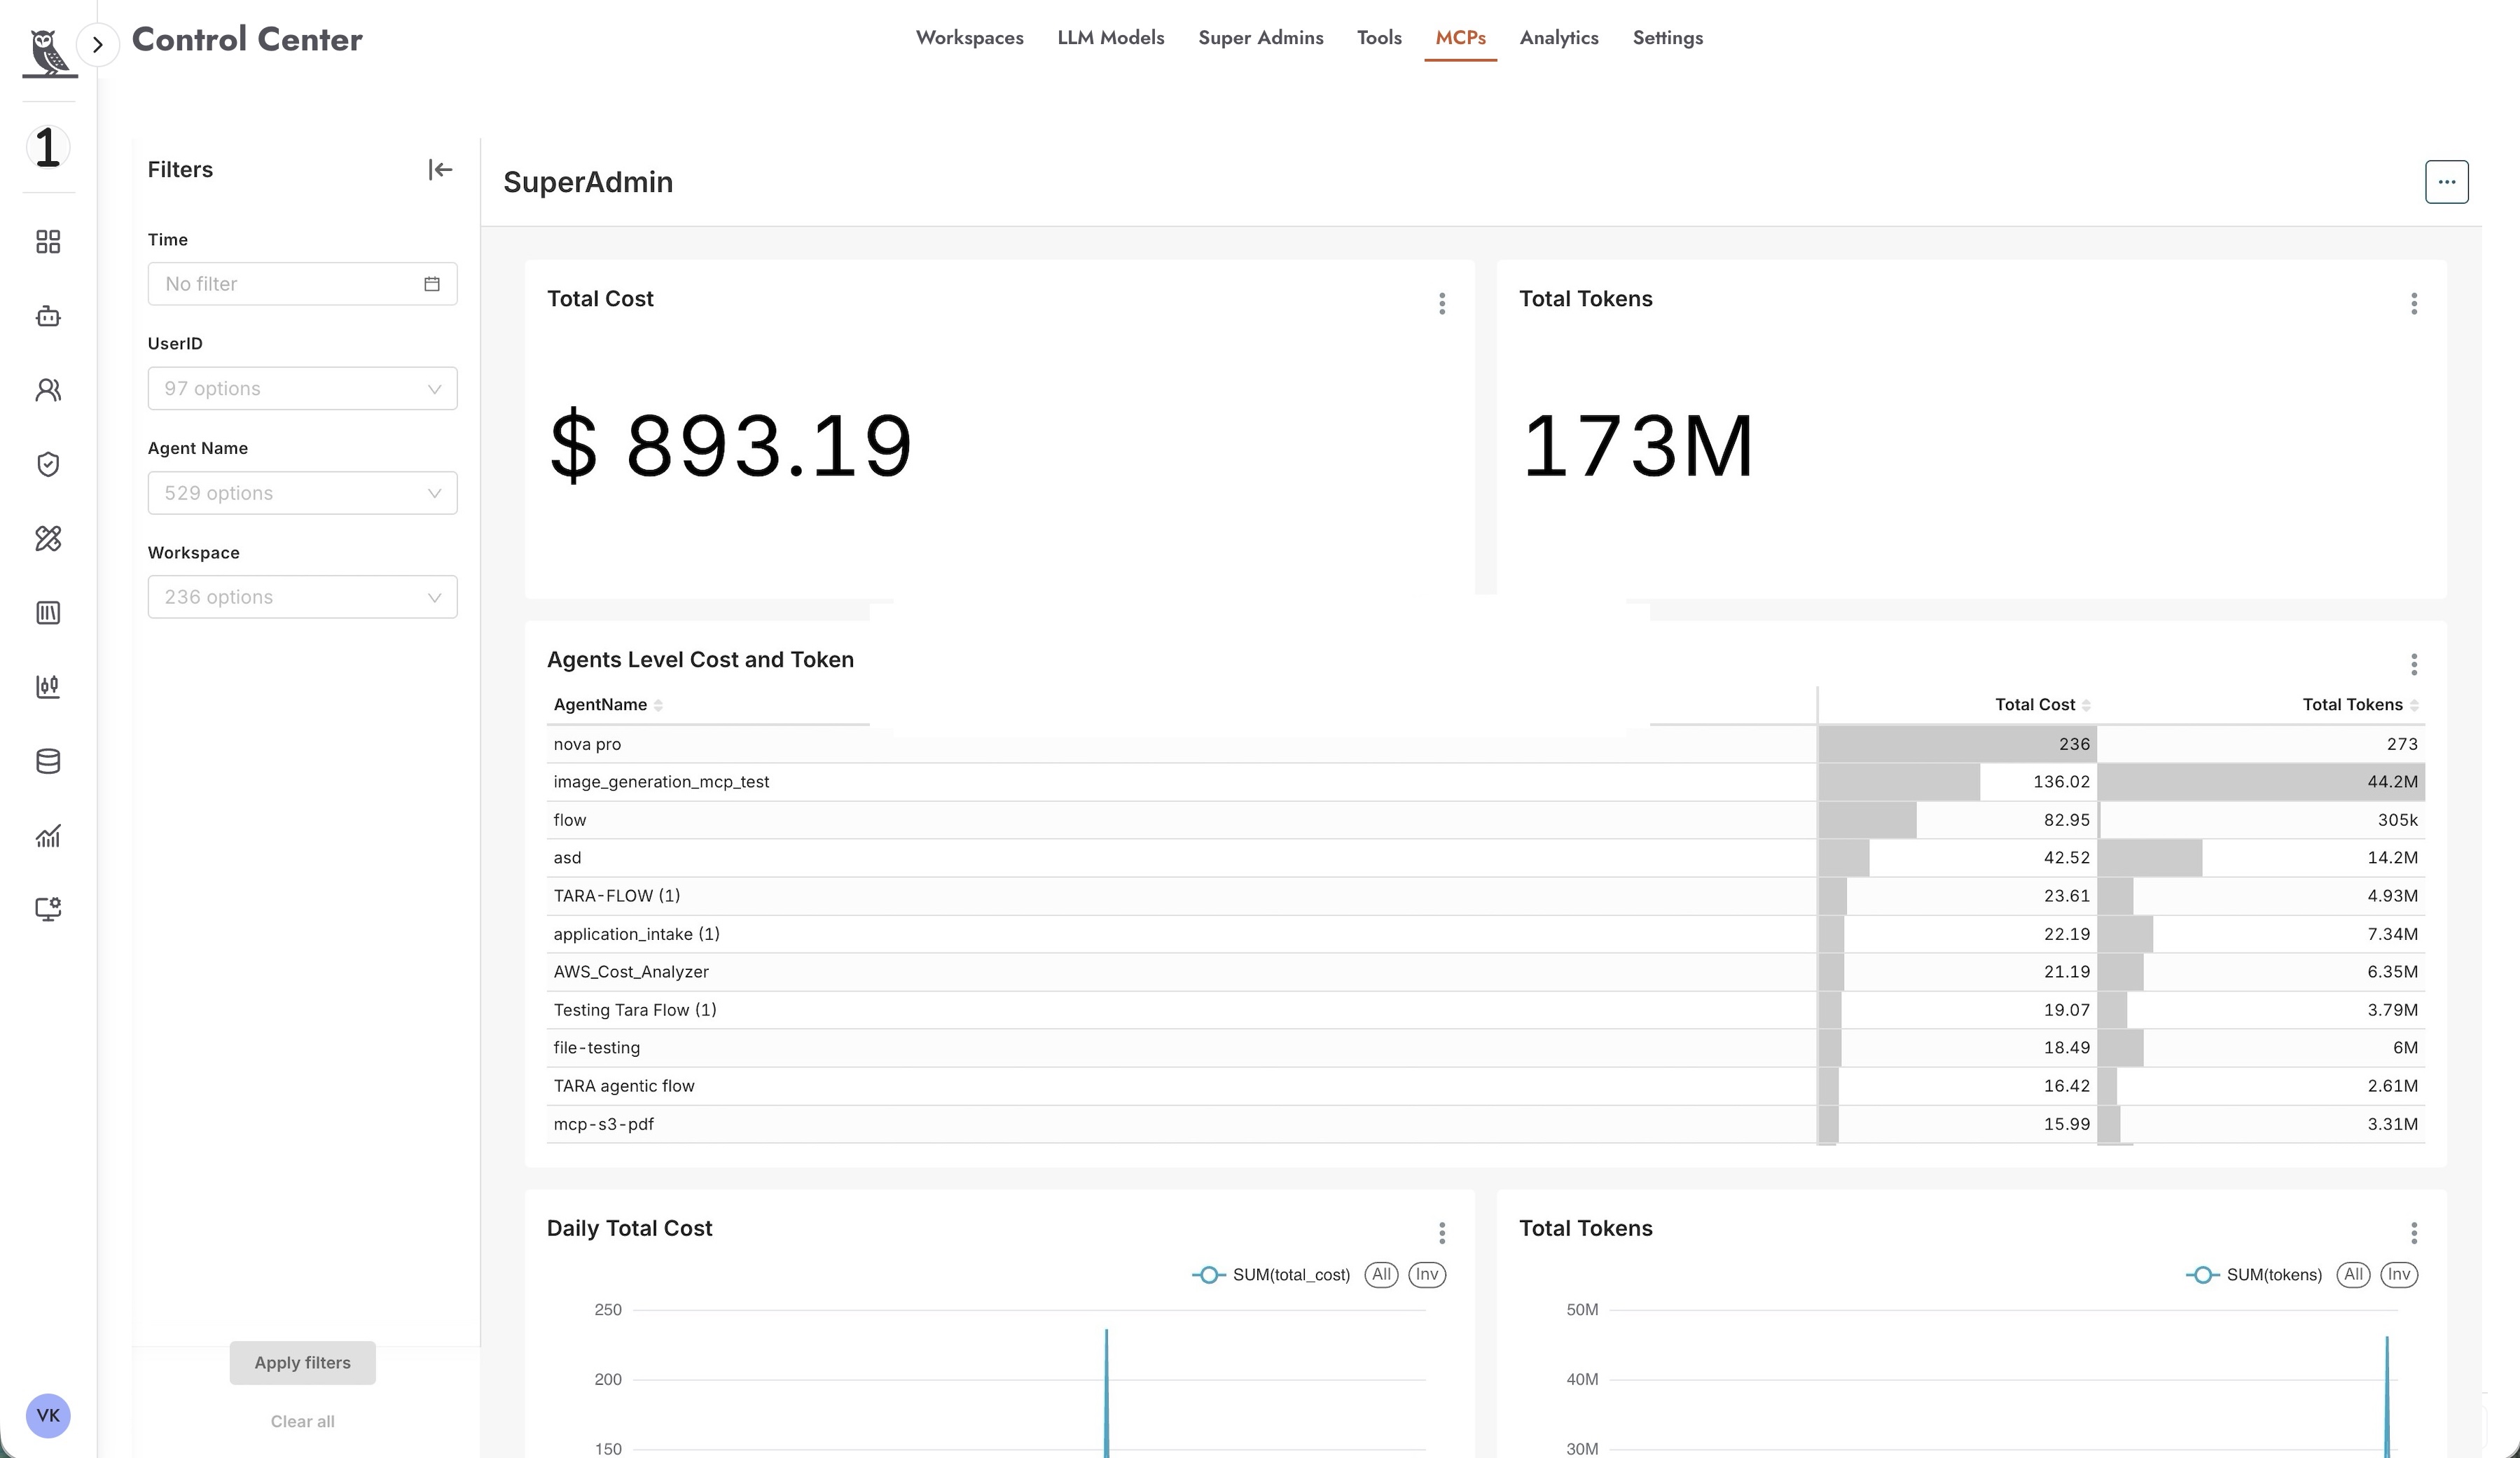
The Analytics tab provides Super Administrators with a comprehensive view of usage metrics across all workspaces. This bird’s-eye view enables platform-wide monitoring, cost management, and capacity planning.
Summary Metrics
The analytics dashboard displays aggregate metrics:
Total Cost - Combined cost across all workspaces (e.g., $893.19)
Total Tokens - Total token consumption across the platform (e.g., 173M)
Filtering Options
Super Administrators can filter analytics data by:
Time - Select specific time periods for analysis
UserID - Filter by specific users across workspaces
Agent Name - Filter by specific agents
Workspace - Filter by specific workspaces or view all
Detailed Breakdowns
The dashboard provides detailed analysis including:
Agents Level Cost and Token - Table showing cost and token consumption per agent across all workspaces
Daily Total Cost - Chart showing cost trends over time
Total Tokens - Chart showing token consumption trends
This platform-wide visibility enables Super Administrators to:
Monitor overall platform usage and costs
Identify high-consumption agents or workspaces
Plan capacity and budget allocation
Detect anomalies or unexpected usage patterns
Super Admins Management
The Super Admins tab allows existing Super Administrators to manage the list of users with super admin privileges.
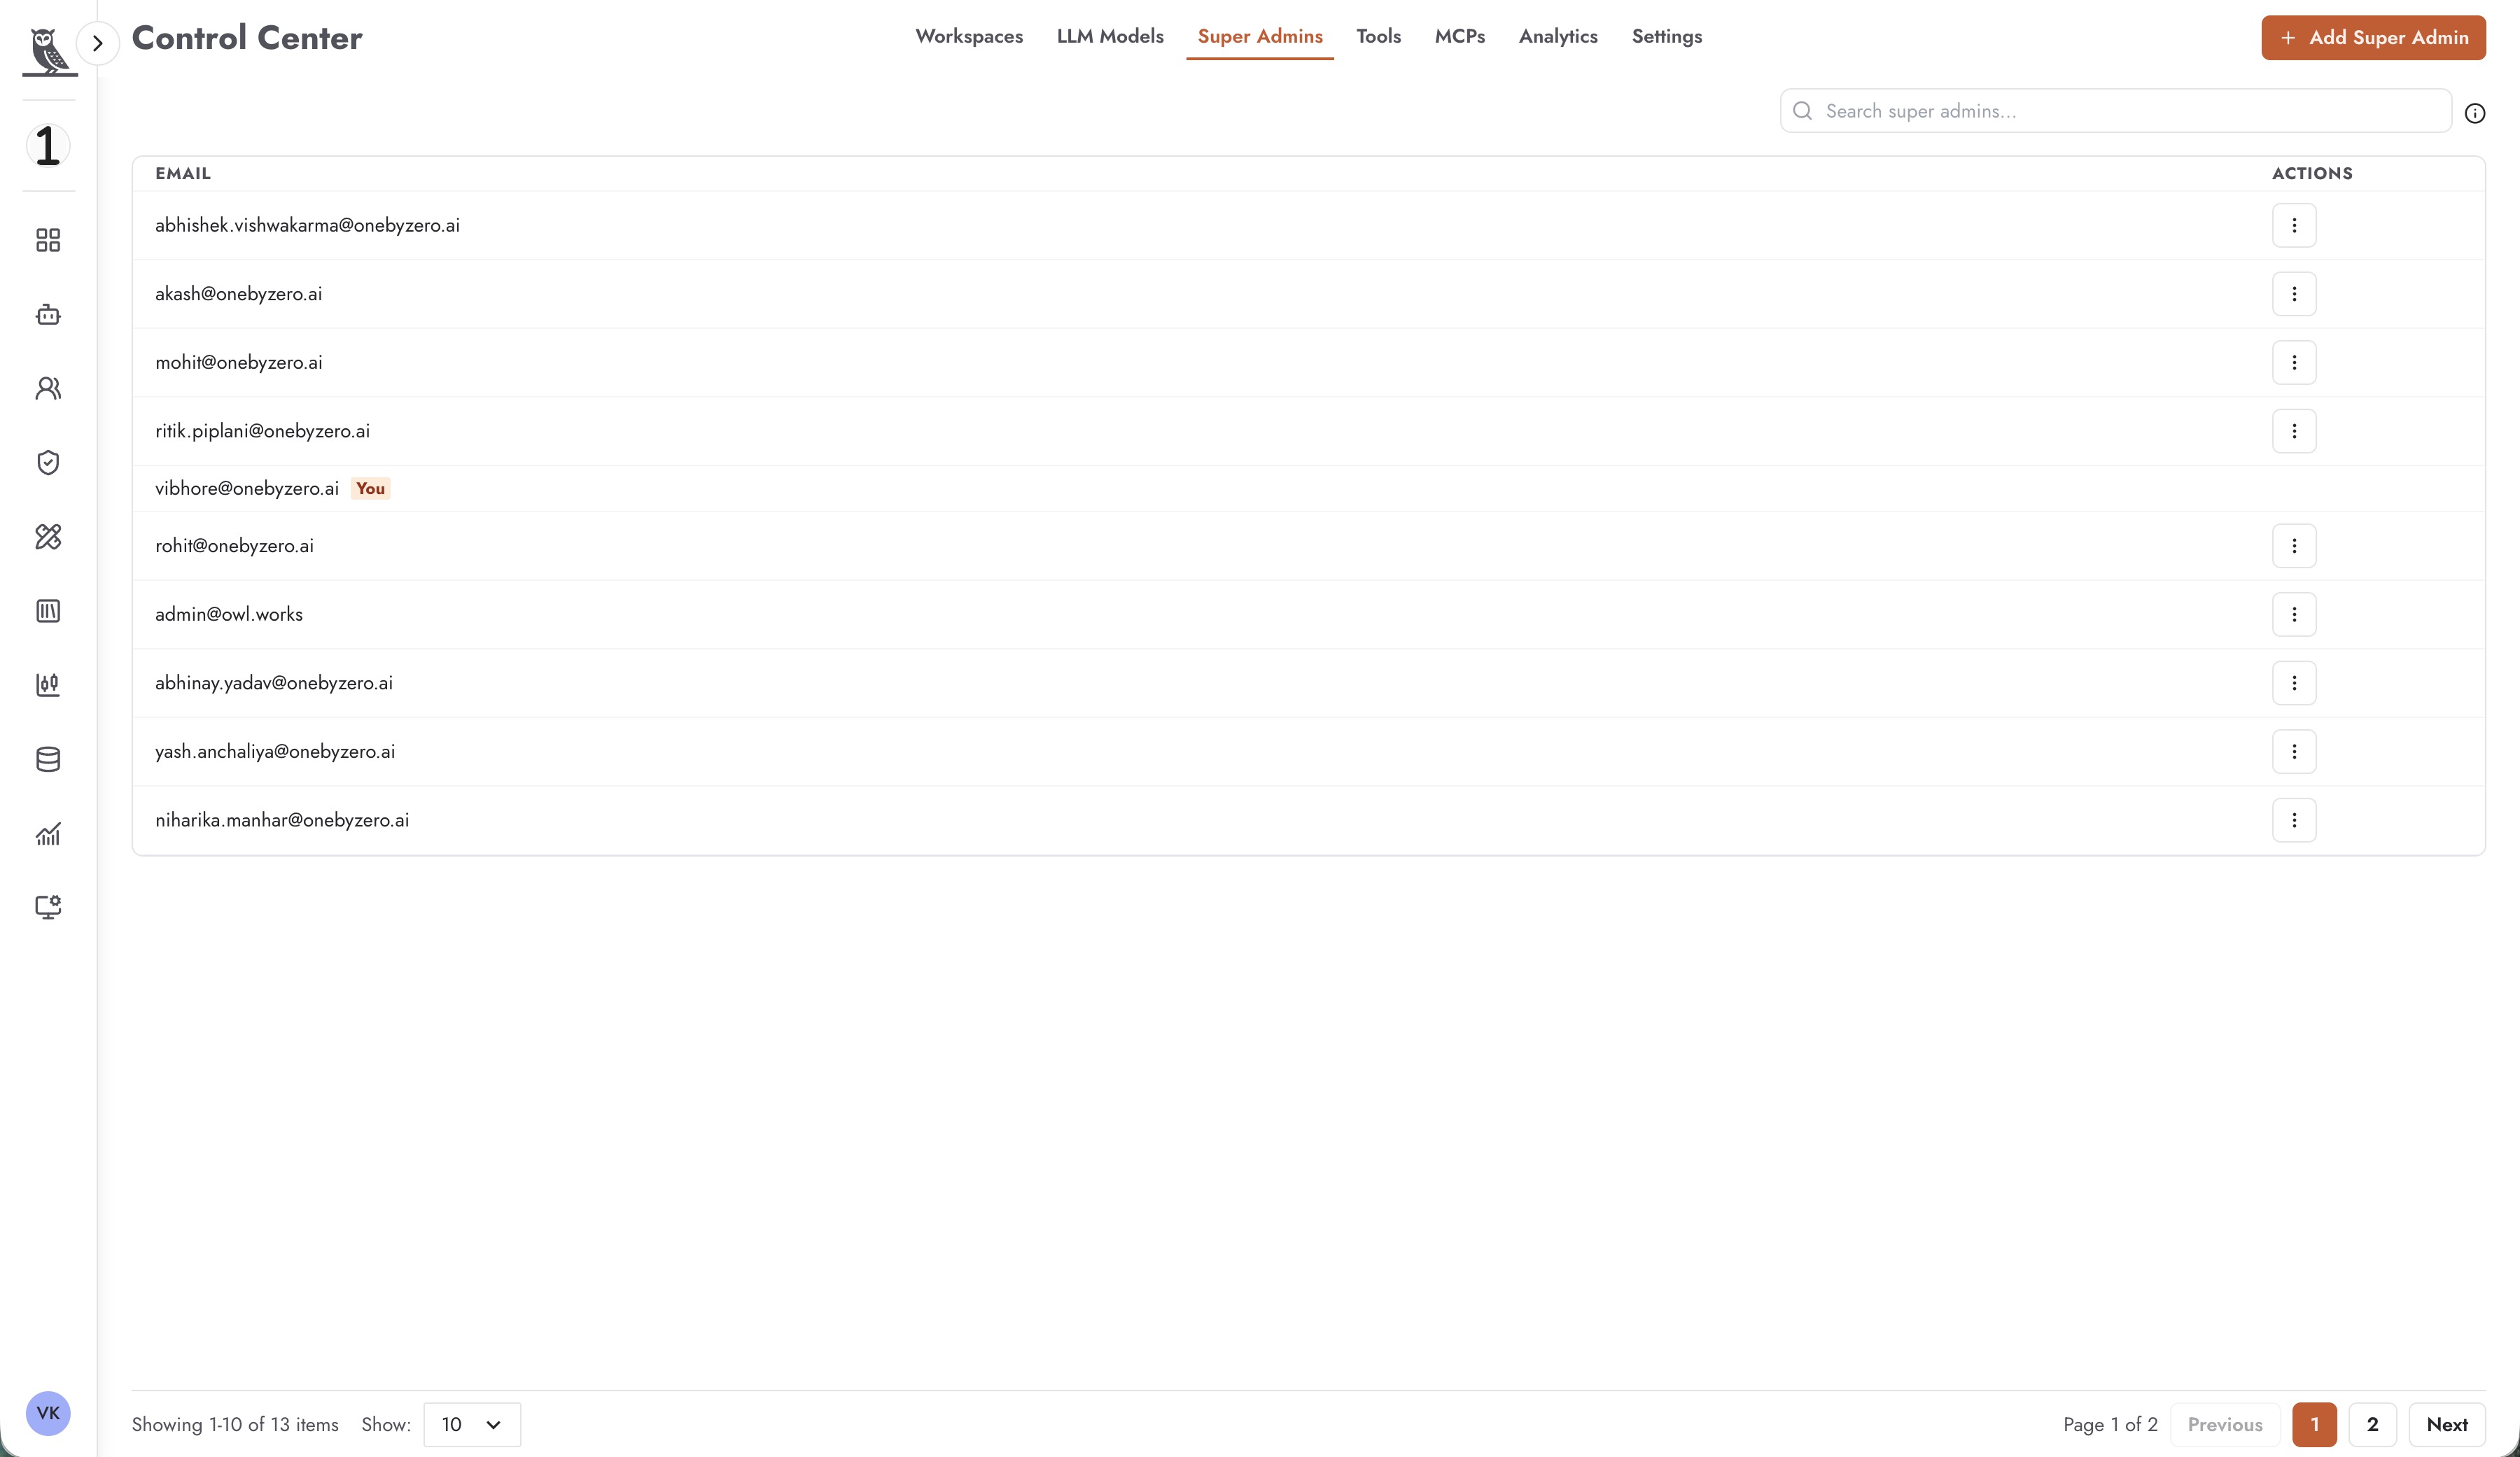
The interface displays:
Email - The email addresses of all Super Administrators
Actions - Menu for managing each super admin (with your own account marked as “You”)
Adding Super Administrators
Click + Add Super Admin to grant super administrator privileges to another user. The user must have an existing account in the system.
Removing Super Administrators
Use the action menu to remove super admin privileges from a user. At least one Super Administrator must remain in the system at all times.
Best Practices for Super Administrators
- Workspace Governance
Establish clear policies for workspace creation and naming conventions. Regularly review workspaces to identify and clean up unused ones.
- Model Management
Carefully evaluate new models before enabling them platform-wide. Consider the cost implications and capabilities of each model.
- Tool and MCP Security
Review enabled tools and MCPs periodically to ensure they align with organizational security policies. Disable any tools that are not actively needed.
- Analytics Review
Establish a regular cadence for reviewing platform-wide analytics. Use insights to optimize resource allocation and identify optimization opportunities.
- Access Control
Limit the number of Super Administrators to those who genuinely need platform-wide access. Regularly audit the super admin list.